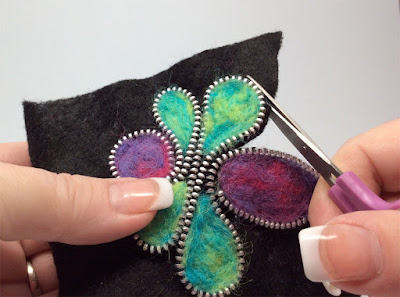
Dream Felt's Needle Felted Zipper Tutorial
I hope you enjoy this tutorial as much I have enjoyed creating it for YOU! All the wool used in my designs was Dream Felt's Norwegian C1. If you have any questions, I am here to help. It is my goal to share my knowledge and help you create a needle felted piece that is not only a piece of art, but a functional piece as well. One to be admired by everyone who sees it. Remember you can also create these into ornaments to be treasured for a lifetime. Be sure to subscribe to our blog for more tutorials coming your way! --------------------->
Material List:
Heavy Duty Zipper Heavy Duty Thread
Embroidery Needle Small Scissor
Flat Back Pin Craft Felt 4" x 6"
Craft Glue Size 38 Star Felting Needle
Norwegian C1 Wool (small amount of different colors)
Separate zipper so you have two pieces.
Cut off both ends of each side of the zipper.
Remove zipper pull, and discard.
Cut off excess fabric along zipper teeth. Cutting approximately 1/8 of an inch from the teeth.
Looking at the cut fabric and you will see that the threads are frayed.
Using a lighter or candle, carefully melt the edge of the zipper. The nylon threads will simply just melt. As always, use caution when working with a open flame.
Looking at the below picture, you can see the frayed threads are now gone.
Thread needle using the heavy duty thread. Tie both ends together so your thread is doubled for sewing on the zipper.
Pull thread from underside of craft felt to the top. Secure the beginning end to the zipper with a few stitches between the first and second tooth.
Sew to secure zipper in areas to keep the design idea in place. Pictured below I have stitched the beginning of the head, the other end of the circle and the center of the wings.
Continue to lay out design and sewing in place until your design is complete. Once this is down, go back and sew around the entire zipper. It is not necessary to stitch between every tooth. I do at least every other tooth. Make sure the zipper is secure on the craft felt.
Needle felt each area in desired colors.
Using your scissor, cut around the entire design approximately 1/8th of an inch from the zipper.
In the picture below you will see that a few of the stitches were cut during the cutting process. Clip those threads off. It is normal to have a few.
Using a craft glue that dries clear, dab a little around the entire outside edge of design. This will secure any threads that might be loose.
Sew the flat back pin to the back of the design. I always secure the pin with sewing through all the holes. Be careful not to put your thread through the front of your design.
After completing this tutorial, I decided to try doing the same idea; however, using glue. Here are the results!
In the following two designs, I used a cool glue gun.
You will also see that the zipper is laying flat and not standing up.
Using your scissors, cut excess glue off. It is important to remove the excess glue on the inside of your designs as this is where you will be needle felting.
Needle felt all your areas. Using your addiQuick speeds up the needle felting process!
Using the glue gun, glue pieces in place.
Embellish your design with embroidery or even a few crystals.
Using a brass chain to match the zipper, I sewed the chain to the back of the two petals using heavy duty thread.
The following design was created using a piece of pre-felt. Dream Felt's Fusion Batt "Painted Desert" was used in this necklace.
Glue your zipper flat on top of your pre-felt.
**VERY IMPORTANT** During the gluing process you want to make sure you press gently on the inside of your zipper so that the excess glue will be pushing to the outside edge of the zipper.
Cut along the outside edge of all your pieces, removing the excess glue in the process.
Once all pieces are complete, glue the design together.
Attach chain to back of design using heavy duty thread.
Enjoy!
I welcome all comments. Please be sure to share your creations from this tutorial with us. We would love to create a gallery and have your masterpiece included.
Happy Felting!
Warmly,
Patti


Thanks Patti, for sharing. Every little bit of knowledge helps, and I really enjoyed your tutorial..
ReplyDeleteThat is awesome Patti, Thank you! I hope to try one soon , maybe next year . Thank you for sharing :)
ReplyDelete